Showing posts with label recycling. Show all posts

Saturday, 18 June 2016

A place for my pens! [Recycling + crocheting]

recycled projects reuse glass bottles


Oh, yes, of course, I'm still alive!
:)
I had a lot do far for the blog and also my crafty life is a bit neglected right now, but all is ok. 
I'm fine, I'm happy, I'm still walking in my self-expressione journey!

I'm dedicating myself to some quick and easy projects these days.
A lot of crocheting involved in them!

Mum visited me in the first days of april and crocheted some Moleskine covers and pencil cases for my shop and I've completed them with fabric, zippers and/or buttons (if you are curious... peach Moleskine case with floral flap - red Moleskine cover with gingham flap - red pencil case).

crocheted ideas accessories

But I was also feeling the urge to crochet something by myself (I looooove to crochet!!! So relaxing!) and I decided to make something useful for my bedside table, always covered by my things (do you remember it in 2012?).

This is what I did:
  • saved from the trash can a little glass bottle (it was for black pepper and I like its shape) 
  • removed the plastic dispenser from the top
  • washed
  • covered with three stripes of crocheted yarn in colors I like


a place for pens on bedside table

Ta-daaa, finished!
:)

Now the pens I use to write with while I'm in bed have a nice place where to stay! Nothing so important, but pretty!
You know, I like covered bottles!

I also finished some sewing projects recently.
The only one I've photographed is the bag I've made for Vera's birthday!

tote bag made of Ikea fabrics

Vera bought two of my bags in the past, the sand tulip bag (pattern by me, altered a bit) and the grey tote (designed by me on her needs).
She liked my work so much, that her boyfriend decided to order me another one, totally new, designed by me.
He was in love with two Ikea fabrics, so I mixed them to make something unique for my sweet friend. 
I know she appreciated; this is the most important part of my work :)

*     *     *

Bags are not quick and easy projects like covering a tiny bottle, but I enjoy a lot the process.
I have a long list (in my brain) of new bags to make soon, mostly using recycled fabrics. And of course I want to sew other bags like the one I've made for Vera, because I like the result and having a new pattern designed by yourself, you know, is amazing! :)

But I still need some quick and easy to fill those 15 minutes I have here and then in my busy days.
Probably I'm going to find new projects in my Pinterest boards "things to try" and "inspirations".

But first I'd like to hear from you: what do you make/do if you have no time for big projects, but feel the urge to create?

Sunday, 5 July 2015

New in the shop: bags with crocheted bottom

In my last post I mentioned my plans to make bags with crocheted bottoms. 
I worked on them in the last two weeks and now I can show you the final result.

I think mixing fabric and crochet is an interesting idea, expecially if you are interested in something informal, quite rustic, strong enough to carry your essentials, but with the romantic accent given by crocheted details.
I don't now why I've abandoned this idea after my first (good) experiment more than 4 years ago.

Anyway, I made two different bags, starting from two similar (in their shape) bottoms. I like to be various when I create :)

The first one I finished is this shoulder bag:

eco-friendly bag by madamerenard

It has a crocheted plastic button + a strap for closure.
Inside I've fully lined it with a vintage striped fabric (it comes from an italian tailor's shop closed in the 80s).

eco-friendly bag by madamerenard

Here a close-up of the bottom made by AuntFran:

eco-friendly bag by madamerenard

Then I made this tote:

eco-friendly bag by madamerenard


The peculiarity of this bag is the white fabric used for the exterior parts: a recycled upholstery fabric, saved from the workshop of a friend here in Sicily (he was going to throw it in the trash can, because the pieces were too small for his work).
This fabric has a pattern of leaves you can see if you look closely at it:

eco-friendly bag by madamerenard

Do you like the stitches used by AuntFran? 
I do, I do. This pattern is probably my favourite. She often uses it, expecially for her pencil cases and pouches.

This bag's design is quite simple: a "regular" tote with two straps. 
But I gave attention to some details, like the zippered closure and the inner pocket:

handmade white bag by madamerenard

Very proud of me and of the skillness I've reached after years and years of sewing bags! :)

My plans are to going on making complex bags, with pockets, zippers, adjustable straps and other details that make the bags more "professional" in their look (although I want to save also their handcrafted peculiarities).

AuntFran made for me a crocheted bracelet, too!

handmade braided bracelet by madamerenard

I added a recycled mother-of-pearls button and voilà... listed in the shop, ready to be matched with one of the white bags!

*     *     *

I'd really like to hear your opinion about these bags in the comments.
Someone said me they are beautiful, but look too delicate for everyday use.
What do you think?
I do not agree, because I know how the fabric and the bottom are strong. And the white surface can be washed without problems in tepid water by hands and then ironed. No difficult manteinance!
Leave me you thoughts in the comments!

I'm visualizing a young woman with one of these bags on her shoulders while having a short holiday in the country, this summer. Or having it as a good company while exploring little ancient villages in Europe...

Thursday, 26 February 2015

New products in the shop - mad for wallets making

A lot of sewing for the shop recently! 
I've made some new products and I discovered I'm mad for wallets making!
Oh, how I love those little fabric accessories! 
They help me in using some little scraps I have in my stash (only small rectangles and squares needed!) and are little projects to work with when you have only short time for craft.

I design by myself my wallets. Sometime they are embroidered. Some are made of recycled materials, some have leather straps. Inside they have pockets for paper money and for coins, closed by a strap of velcro or by tiny zippers.
I like to vary :D

These are the wallets recently added to my shop:


wallet by madamerenard on etsy


wallet by madamerenard on etsy


mini billfold wallet in gold with little flowers

recycled wallet


unisex billfold wallet by madamerenard on etsy

unisex billfold wallet by madamerenard on etsy

I liked so much this wallet that I decided to use the same materials for a fabric Moleskine cover.

The risult is this African print Moleskine cover:

fabric cover for moleskine journal

And of course a new bag!
I made another Josy Clutch (pattern by Ithinksew) to offer as an alternative of a Tulip bag made of the same fabric.
Do you like it?


handmade fabric bag

That's all!

Tuesday, 18 November 2014

Refashion: from trousers to skirt

After a very long time I finally spent a couple of hours refashioning old clothes.
Refashion is one of my favourite craft!
Since I have difficulties in throwing away my old things, I like to give them a new life to keep them with me for some more. 
And this is expecially important for beloved clothes, like a pair of Esprit grey trousers I bought 4-5 years ago and wore almost till consumption (they were so confy and their fabric so good!!!).
Making a skirt out of them, cutting away the damaged parts, seemed a good idea. So I did it!

This is the before&after photo-collage:


And this is the photo of the back:


the final result is a pencil skirt and a "tear" is higly reccomended to walk without problems.
I realized it simply folding the fabric inside and sewing. 
I know this isn't the right way to realize these details in clothes, but it's a simple solution for a very informal skirt like this.

The skirt is not perfect.
Making a perfect skirt recycling a pair of trousers is almost a "mission impossible", because the fabric's cut in trousers follows curve lines that are very difficult to conceal when it's time to sew the skirt.

But if you want to try you can follow these tutorials:
- "Pants to pencil skirt" by La vie DIY
- Tutorial by sewmakeplay (a different solution from the front)
- 5 ways to turn jeans into a skirt with different skirt designs
- "Turn pants onto a skirt" by Potluck on the porch

Here in my Pinterest board about refashion you can find other tutorials and inspirations if you want to save an old pair of trousers (or other clothes you love).

Monday, 27 October 2014

My cats sleep on damask

My cats sleep on damask. Velvety damask. 
They are very lucky cats!


Carotina, my cat, sleeping on handmade pilllow

This is Carotina (Macchia's child) yesterday in the afternoon sleeping on the damask pillow I made for my cats. 
I've placed it between the glass door and the shutter of the kitchen while I was tidying up after a family lunch.
He had a very good sleep, I suppose. 
When he woke up this was his face:

Carotina, my cat, woke up after a nap on his new pillow

So satisfied by his nap!!! :)

The pillow is a novelty for Macchia and Carotina.
We needed a pillow to insert into the "kennel for cats" we bought in a shop some days ago. 
Winter is coming and, although sicilian weather is mild even in winter, nights can be very chilly and windy and wet for our cats who live their wild life mostly outdoor. 
We bought a very practical plastic kennel to offer them a dry and warm refuge, but it hadn't a pillow (and all people know how much cats love to sleep on pillows!). So I made it by myself recycling some upholstery damask and other materials.

I'm happy when I can make things I need using my hands and skills, saving money and recycling materials I already have.

Here are some snapshots I took while making the pillow.

Making a recycled cat pillow

I sewed together three different pieces of old upholstery damask to make a rectangle. They are yellow, but one has a pattern of green leaves.
Then I stuffed the almost ready pillow with other recycled fabrics (you can see one of the sample I've used on the left of my sewing machine).

Making a recycled cat pillow

I can't use these fabrics for my bags and accessories, because they are too lightweight and soft. And transparent, too (they are for decorative curtains making, I suppose).
But they are perfect for stuffing a pillow :)

Then I closed the open side with pins and sewed.

How to make a pillow for cats

This is the pillow in its place, into the bottom of the kennel:

Recycled pillow for cats

I'm happy this project is ecological, 100% made of recycled materials.
And I'm happy my cats immediatly appreciated the pilow I made for them. They look very pleased to have a confortable place for sleeping :)


(I'm in love with this little cat and his green eyes)

Saturday, 11 October 2014

A failed project: t-shirt yarn mat

Sometimes things don't go as planned in my crafty world.
And I'm very disapponted this time! -____-
I have a big amount of t-shirt yarn in my stash and last July I decided to use it in some ways. 

After a bad start with my giant crochet hook, I turned to braiding the yarn to have a continuous braid to sew on my sewing machine and making a little mat for my desk.
You probably know what I'm writing about: my plans were to make something like this or this. 
They are so beautiful and colorful!!!

I followed the instructions, but, uhm, my mat started to curve. 
I haven't pulled my braid, I don't know what happened exactly, but I had this:


An ugly shapeless "thing". Whithout a regular shape, a sort of trod "sombrero" (the typicall mexican hat).

I finished to work on it some days ago and now it rests on my desk waiting to know its future destiny: the trash can or a new life?
I don't know.
I takes a more regular shape if I fold it in two:


But I can't see any use of it folded in this way!
And, yes, the curve shape suggests it can become a basket, but it's so crooked! It drives me crazy!!!

This is not the first time for me to see a projects that fails: do you remember my ugly bird?
But this time it's worse!
Anyway, this week other projects went oh, so, good! I'm making new bags for the shop and luckily they are very well done and beautiful, in my opinion. You can see a preview here and here! 
Opinions?
Suggestions about my failed mat are welcome, too!

Friday, 16 August 2013

And what about bottle caps?

While saving glass bottles to cover them with crochet (my favourite summer project, this year), I've pondered a little about what to do with their metallic caps.
In Italy we call them "tappo a corona" ("cap with a crown shape").
I've always loved them, because they are often decorated by images and words that make a tiny work of art, not so different from other little works of art I love (postage stamps).
I usually throw away bottle caps, but now I'm thinking about recycling them and saving their "art" and/or give new life to their beautiful crown shape.
 
I've found tons of lovely project on Pinterest and today I want to share with you my favourite projects.
You can see that both inside and outside of the caps can be used.
 
Amazing fridge magnets that are also family photo frames:


Tiny candles for outdoor romantic dinners in summer (I think they can float on water, too):
 
 
Earrings... a super quick project. You can cover them with images you like, or not.
 

Bottle caps + macramet for bracelets:


Recycled materials are always welcomed for Xmas decorations (Pam, this is for you) like balls ....
 
... or snowmen:


But I mostly love recycled materials for toys making:


If you have hundres of caps... you can even cover your furniture (*____*)...
 
 
... or make a self-portrait:
 
 
Save your bottle caps!!! :)

Wednesday, 7 August 2013

100% recycled: crochet-covered bottle... again!

After covering with crochet my first bottle, I started to look to the drinks I bring home in a different way.
I used to neglect the shape of their containers, but now that I've started to cover bottles, well, I've also started to look for nice ones, eh eh.
And I found little beer bottles some weeks ago, brown with amber tones and not too big, perfect for my projects!

I started to crochet a cover on it without a well defined idea in my mind.
I decided to start and follow inspiration (this is my favourite creative habit!) and to try something more complex that my first experiment.

After some rows of single crochet stitches to make the bottom, I realized one row of double crochet.
Then I decided to make a net to emphatize the contrast between the brown of the glass and the cream white of the cotton yarn (recycled).
I love how the net came out!
It's so simple to make. You have to alternate 1 double crochet and 1 chain stitch.

To end the work I decided for symmetry, so I made another row of double crochet and finished with a simple border of single crochet.

You've probably noticed that this is a 100% recycled project.
And I'm in love with this aspect of the thing.
The power of craftiness in my opinion stays in the fact that you haven't to buy the objects you need, but you can make them yourself starting with what you already have in hands!
Crafty people can work on a different (and planet friendly) economy! :)

And so I have a new glass pot for my flowers!
Uhm, I need a coloured flower for it!
We are growing dahlias this summer, too, and they are so beautiful and full of colors! Simply perfect to give light to our rooms!

[about the first photo: yes, there is a boomerang near the bottle... we recently received it as a gift from some relatives who live in Australia and came back in Sicily for the holidays. Lovely gift!!!]

Friday, 14 June 2013

Me in chains! :P

Chains have different symbolic meanings, some positive and some negative.
They can be a strong metaphor for lack of freedom in life or stifling situations, but also for strong and positive relationship, don't you think?
 
I was thinking of these meanings while adding a metallic chain to a new bag, last Wednesday; I like best the positive message inside this symbol, of course!
 
Then a small portion of the chain remained; its lenght was perfect to make a bracelet, so I decided to try to realize one of those chain+fabric bracelets I've recently seen on Pinterest.
 
I'm not an expert in jewelry making, so I started simple: I used a thread of jersey leftovers (the jersey I used for the blue spring top) and I've wrapped it into the chain.
So easy!
 
It closes thanks to a little snap button (not sure if it's the correct english name for it, can you help me?).
 
It's a simple project that even a child can make!
You can jump the sewing/button part simply closing your bracelet with a knot!
 
And if you like less simple jewelry... you can add charms! :)
 
 
So this is me (my wrist) in chains!
Not bad :)

Friday, 7 June 2013

Just for fun...

... I covered a bottle with crochet!

Sometimes we offer to our friends some drinks sold into little bottles, very common here in Italy (and in other parts of the world, I suppose).
They usually finish their life into the trash can, together with other glass objects waiting to be recycled.
 
But last week I saw on Pinterest [*] some covered bottles and I thought it was the time to recycle mine and make a tiny vase for flowers.
Although I'm surrounded by flowers and plants, I haven't a proper vase to put them, so I made one, instead of buying it! Craft power!
I haven't spent money for my vase and I had fun :)
 
I've simply covered my bottle with rows and rows of some green cotton thread AuntFran gave me years ago (previously used for this mouse).
I picked up this cotton because I want to add green to my life, do you remember?
Since green cotton finished too early, I went on with light cream (recycled).
You probably know that color block is super trendy, uh?
 
Now the new vase is in my bedroom. It is hosting two lilac flowers, near Zarina, the painted gourd Pam sent me this winter.
A lovely sight I can enjoy from my bed! :)
 
 
[*] I can't find the original pin that inspired me to make this bottle.
But in Pinterest you can find many projects around the them "covered bottle", like these covered with yarn, or cord, fabric, and even stones! 

Friday, 22 March 2013

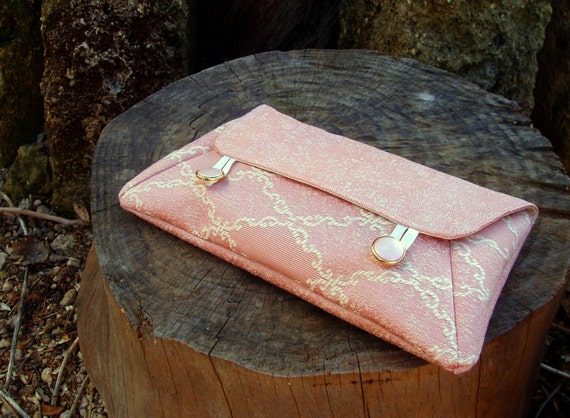
Pastel bags in recycled damask

Yesterday I published two photos of two new bags I made, writing a little note about the new "country inspired" background I'm exprimenting with.
I photographed them near to an old cement wall: it is in the back of our little house (ehm, ruin!) in the country.
Some photos on some trunks under the big mulberry tree, too.
Love these new backgrounds and the clean light! :)
 
And what about the bags?
They are made of recycled damask, received by my friend-upholsterer, Vincenzo. He gave me some sheets from old pattern books, in perfect conditions, as usual. They are very small, so I decided to sew little bags... pastel colors, classic patterns... perfect for spring events, like weddings, etc.
 
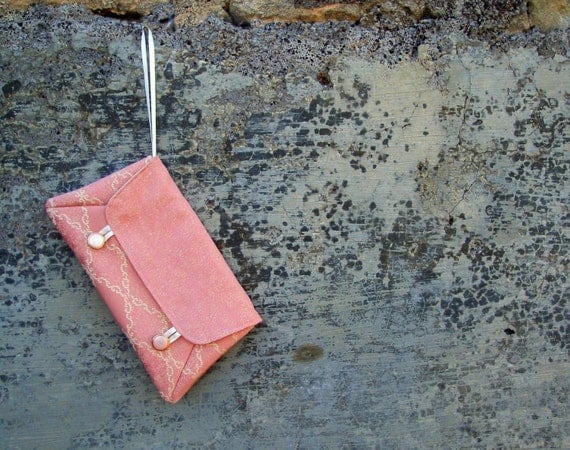
The first one  (an envelope clutch) is pink:
 
 
The pattern is by Ithinksew.com (Alanis clutch), but I've altered it a bit, adding vintage plastic buttons and ribbon.
It's a simple pattern, but the first time I tested it (last June) I made a disaster: this clutch needs interfacing, of course, and I choosed rigid fusibile interfacing, because my idea was to make a rigid clutch.
Big error!
It was almost impossible to turn inside-out, after finishing it, and I ripped some seams.
Lesson learned: for this bag I used my faithful plastic net and all went right!
So, if you want to make this clutch, remember to choose the proper interfacing!
 
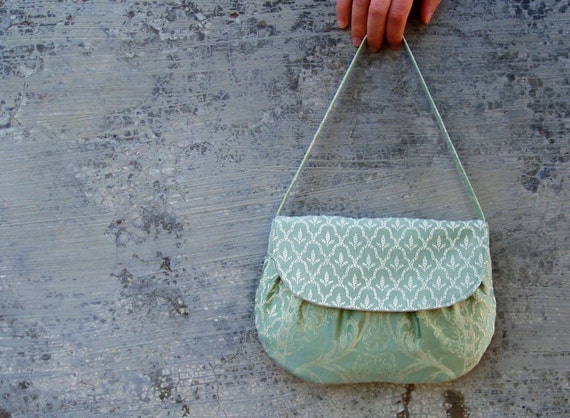
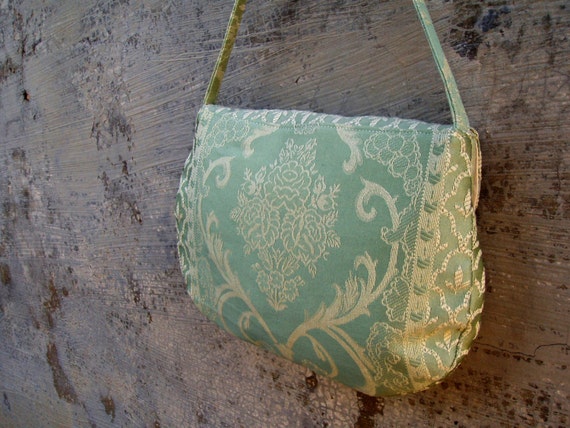
The second bag is green, in a lovely tone between sage green and jade:
 
 
For this bag I worked again on Josy clutch pattern by Ithinksew, one of my favourite patterns of this brand (probably you'll remember I used it a lot in the past).
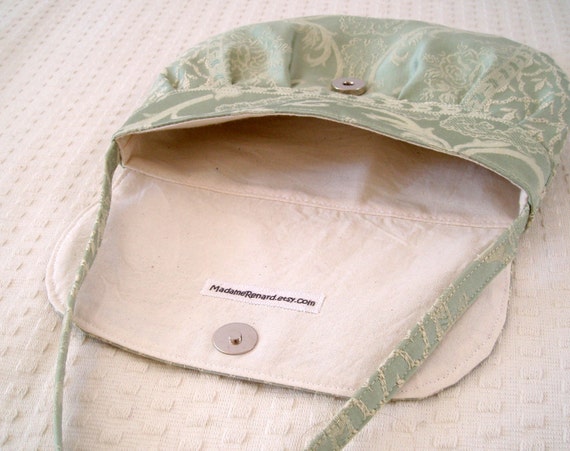
I love the back of the bag: it has a pattern of roses:
 
 
Both the bags have a lining in a natural cotton+linen fabric in cream: it makes a nice contrast with the shiny and soft damask and gives a touch of "rustic".
 
Related Posts Plugin for WordPress, Blogger...