Showing posts with label tutorial. Show all posts

Tuesday, 14 July 2015

How to display little embroidered works (the not professional way)

In my latest post I wrote about the fact I've decided to display my little embroidered fox and showed you the result.
While working on this project I've taken some snapshots of the process. What do you think about converting the whole bunch in a sort of tutorial?
Great idea, I know :P

I'm calling it "How to display little embroidery projects". It's not a professional way to display or frame pieces of embroidery. Only my way.
Hope it will inspire you to pull out the drawer some unfinished embroidery projects (I'm sure they are lovely) and display them in your home.
I think it can be a smart idea to give a new life to some old/vintage pieces of fabrics.
What I like of this process is that glues are not included. Only fabric, felt, needles, thread and recycled cardboard!

Let's go!

framed cross stitch works

First thing to do: cut a recycled cardboard and round the corners (it will help to get a finer result). The cardboard has to be a bit smaller that the piece of embroidery you are working with, of course.

cross stitch fox framed

Second step: place the carboard on the back of the fabric and fold each corner in the way you can see in the photo-collage below.
Help the fabric and the corners to stay in their place with some hand-stitching. You can notice that I've connected the opposite sides of the folded fabric with some long stitches. This trick made on the back helps to have a tight effect on the front.

embroidered fox in a frame

Step 3: cut a square of felt (synthetic in my project) and decorate it (optional; I've embroidered '2013', because I was sure I've completed my fox two years ago, but I was wrong).
Fix the square with some stitches made by hands. I suggest to use blanket stitch (love its delicate look), but you can use different methods if you prefer.

madamerenard tutorial

Step 4: it's time to hang up your work of art. Simply fix a little noos on the back and find a nail on the wall.

adding a noos to the  back of a fabric card

But if you (like me) are in the mood for arranging it on a shelf you can alter the shape of a paper clip and insert it between the felt cloth and the cardboard. It will do the work of a frame foot.
Interesting, uh?
:)

tutorial by madamerenard

Love to have my fox in my studio's bookcase :)


cross stitch fox

Other methods to display or frame embroidery used by other people (but a bi tmore expensive than mine):

Let me know if you like this tutorial and share with me your embroidery masterpieces leaving a comment!

Wednesday, 8 April 2015

Tutorial: make a soft keychain! (embroidered or not)

sewing tutorial for beginners - DIY keychain

If you liked my soft+embroidered keychains, you probably would like to make one for yourself instead of buying it.
So I decided to collect in a (sort of) tutorial all the photos I've taken while making the blue deer keychain.

It's a super easy and short project:
- you don't have to use an embroidered front panel if you can't embroidery: you can simply sew together two squares of fabric of your choice
- you can make these keychains even if you don't own a sewing machine: you can sew by hands, it will take short time because they are very small
This projects is for beginners, too! You don't need complex sewing skills, but only a few basic notions!

Make with me a soft stuffed keychain!

WHAT DO YOU NEED


- two fabric squares (one of them is embroidered, if you want) - cm 6,5 x 6,5 (approx. in. 2.5x2.5)
- scissors
- sewing thread
- cord (mine is recycled) - cm 8 long (approx. in. 3.5)
- pins and needles
- stuffing fibers (I use polyfill, synthetic)
- fliseline or other kinds of fusible interfacing (optional)

OPTIONAL: STRENGHTEN YOUR FABRIC WITH FLISELINE


If your fabric is lightweight, my suggestion is to strenghten it by ironing on the back a thin sheet of fliseline. It will help also your embroidery to stay in its place. I usually do it for all the embroidery projects I want to sew.
This is an optional step. You can jump it if your fabric is strong enough.

ARRANGE THE CORD
Fold the cord in two and fix the extremities with some hand-stitches.


Then place it on the half point of the top side and fix with a little seam near the perimeter.


SEW THE KEYCHAIN
Place your fabric squares, fix with pins and sew.


Don't forget to leave a little segment open!


My suggestion is to make rounded corners: they come out better when you stuff squares or rectangles.

Drawing a sewing line can help in making a precise seam, expecially when the thing you are sewing is small.


Be carefull! Don't sew the cord!

TURN INSIDE OUT AND STUFF


The cord, hidden inside, will help you in turning the square inside out. 
A scissor or a pen is helpful for pushing out the corners and the sides. 
When the shape satisfies you, stuff the square with a good amount of stuffing fibers.

CLOSE THE HOLE


With some invisible stitches, made by hands, close the hole.
Invisible stitches are not difficult; they are called "blind stitches", too.
You can find lot of tutorials on line: here a good one!

This is how your stuffed square will look:


FINAL TOUCHES
Add a metallic ring and your keys! :)
Your keychain is finished!

sewing tutorials

And now that you know how to make a stuffed keychain... dont' stop!
You can make others for you friends and relatives (or buy mine in my shop).

sewing tutorial for beginners: embroidered soft keychain

Let me know if this tutorial is useful! Your feedback is important to me.
If you have realized a stuffed keychain following my instructions, leave a link in the comments, so I can see it! :)

Wednesday, 1 April 2015

5 Pinterest boards to follow: Making toys

It's April!!! :)
April is my month! 
I'll turn 38 at the end of this month. 
I'm very happy to be an april girl, because I love this period of the year and particularly these 30 days of spring, warm air, bees, flowers and butterflies!

April is often the month when we celebrate Easter, like it's happening this year. And Easter is very good to make some bunnies for home decor or to give as a gift. If you have some free time for sewing, you can try to make a simple soft bunny using my template and following my photographic "how to".

But if you're looking for other inspirations about toys making, I'm collecting in this post 5 Pinterest boards about this subject.
Not only sewing projects, but also toys made of paper, wood, wool and other materials. 
I love the idea to make toys by myself, both sewn and crocheted.
Since I'm mad for Pinterest, I have my board about DIY toys: you can find it here.


5 amazing Pinterest boards about making toys

1) Plush and doll, by Valentina Debbi
A very cute collection of stuffed and soft carachters to be inspired by.

2) Necessary cuteness (love this title!), by Sharon Rohloff
Super cute animals to love and take care of (Sharon's creatures included).

3) Recycled DIY toys, by Mammabook
An amazing parade of recycled projects to make with (or for) your kids. Cheap and funny!

4) Paper dolls, by Barb Braddy Henderson
Do you like paper dolls? This board is for you (and me, too!)

5) Craft Ideas softies, by Ihanna
Cats, bunnies, owls and... so much more!

Tuesday, 8 January 2013

Corn starch dough tutorial

For those people who asked me more about corn starch dough (also known as "maize dough" or "pasta di mais" in italian) after reading my previous posts (1 and 2) about it...
 
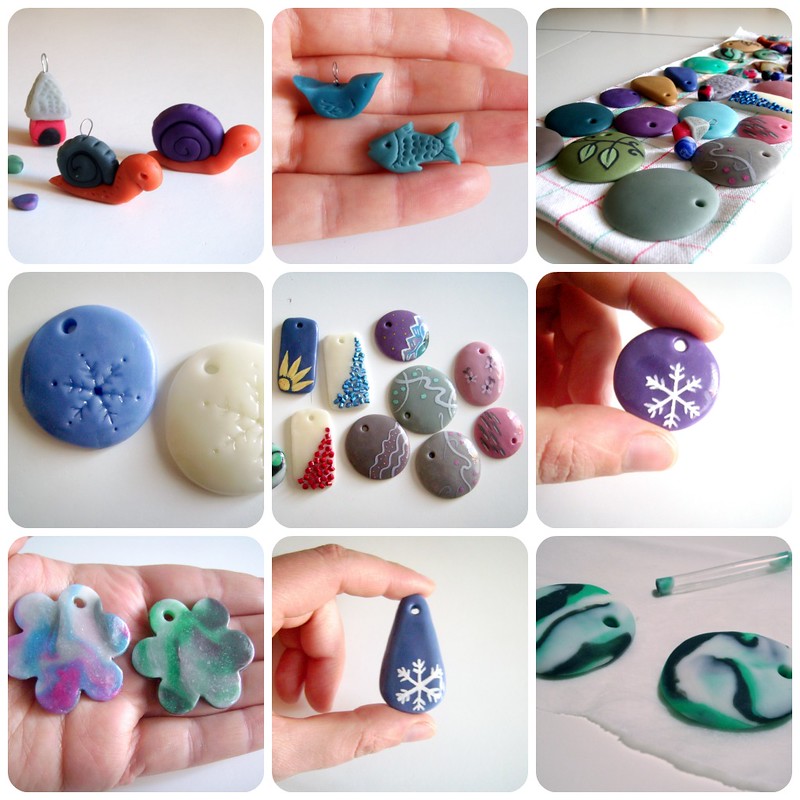
... these are some things I made with mum during these holidays with this surprising dough:
 
 
They are pendants and small figurines of animals I like (and a tiny house and some beads). You can see them better in my Flickr album here.
 
Working with it is super funny and simple, a great idea to keep the children busy too! You can made almost anything with this dough: you can find a lot on the web, for example writing "pasta di mais" in google images.
 
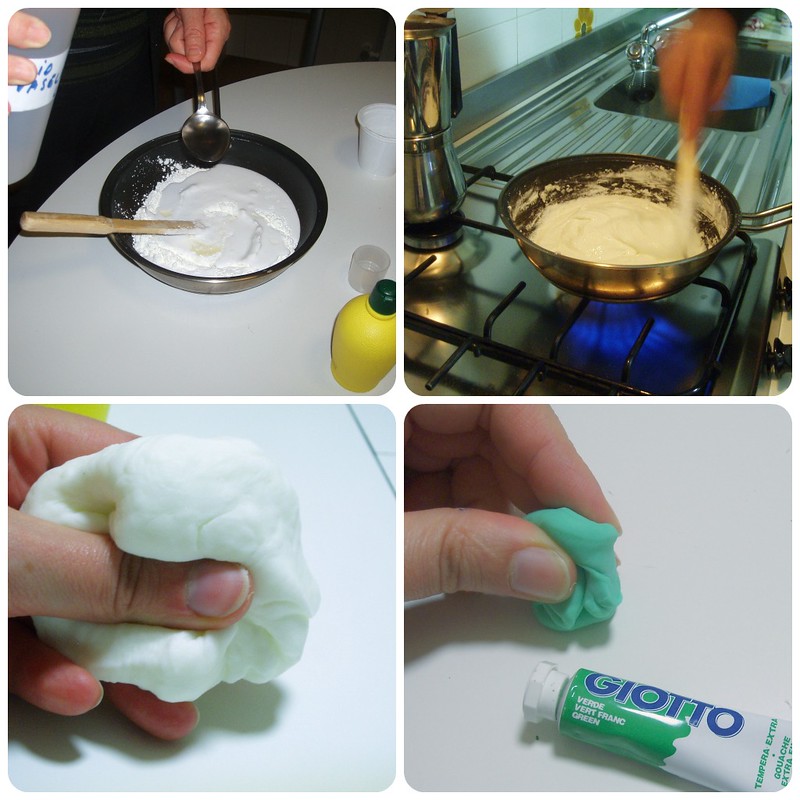
I took some photos while mum was preparing the dough, so I can explain you a bit how to do if you want to make it for you (Pam, I know you want! :P).
A sort of tutorial, in my not-so-technical style (sorry!).
 
 
INGREDIENTS:
- 1 cup (we used a yogurt pot) of corn starch
- 1 cup of vinyl glue
- 1 tablespoon of lemon juice
- 1 tabelspoon of liquid vaseline (vaseline oil) 
 
PROCEDURE:
- mix glue+vaseline+lemon in an old pot/pan
- add corn starch and blend it very well to the liquids (no clots, please!)
- put the pot on your kitchen's burner (low fire) and go on blending till the dough will thicken and separate itself from the pot
- turn the fire off, remove the dough with your hands (some people suggest to massage your hands with some moisturizer before) and start knead till the dough will be cold.
- save the dough in plastic wrap (it lasts 3-4 weeks if well closed into the wrap)
 
With this method you will have white dough (mat or translucent, it depends of the quality of the glue you use).
But the funny thing is that you can colour it simply adding some drops of tempera paint (add it to the dough and knead it till the tempera is totally absorbed).
You can even mix two coloured dough to have the color you want (example: mix some yellow dough and some blue dough to have green).
 
DRYING OF YOUR MASTERPIECES
after shaping your corn starch dough into something (pendants, animal, little bowls...) you have to wait 1-2 days for the drying.
Simply place your masterpieces on a fabric cloth and... wait! :)
No oven or other cooking methods; and this is good!
After the drying the dough will be strong and smooth.
 
DECORATING and FINISHING
When the dough is dry you can decorate it with drawings and paint.
Mum made some beautiful pendants adding some flowers or lines+dots with tempera paint on the dry surface. I painted some snowflakes (I know, I'm obsessed!) and a mountain landscape.
And don't forget to embellish your masterpieces with some transparent varnish to protect them!
 
I hope this post is clear.
You can also look at this video to see all the passages (in italian, but intuitive for all, I think).
 
Please, let me know if you try!!! :)

Thursday, 27 September 2012

Tutorial: fabric bows!

Making fabric bow brooches is so easy and funny that I decided to write a tutorial for those people who want to try to make one of these cute things (and two, three, four... it's addictive, believe me!).
 
Please, if you follow my tutorial, write a comment to this post and share with me a link to your bows! I will be very happy to see your creations! :)
 
Are you ready?
Let's go!

(click on the photos to enlarge them and see all the details)


PRELIMINARY STEPS: Preparing materials and supplies
1. Materials: two stripes of fabric for the bow, one for the central knot, a security pin.
Fabric stripe's measurements can vary; my pieces are approximately cm 16x5 (bow) and cm 3x5 (knot) and the finished bow is cm 8x3,5.
2. Wrong side together, sew the bigger stripes on long sides
3. Then turn inside out: you have a sort of fabric tube. Press it with your iron to have a rectangle.
4. Prepare the central knot: fold the fabric like in the photo and press.
5. Then sew along both the long sides.
 
MAKING THE BOW
6. After marking the middle on the back of your rectangle, fold it like in the photo and stop it with a seam.
7. Fold in the way you like best
 
Now it's time for hand-stitching! :)
8. Stop the bow with some stitches by hand. Be sure your bow is strong before going on.
 

FINAL STEPS: making the central knot and adding the pin
9. Fix the knot with some stitches on the back of the bow and roll it around. Don't cut the thread, you need it for step 11.
10. The central knot isn't only decorative: as you can see it hides all the raw edges of the fabric and the seams. Also the knot as raw edges: fold inside the free end to hide them.
11. Fix with invisible stitches the central knot to the bow.
12. Add a security pin on the back.
 
The fabric bow brooch is finished:
 
OTHER IDEAS / VARIATIONS
- you can make the central knot in an easier way with a ribbon, like I did fot the lilac bow
- you can fold the rectangle in different ways: you can see one of them in the lilac bow (same fold in the front and in the back). Look for other bows in Etsy or with google images to be inspired! 
- if you haven't a pin with holes to sew to your brooch, you can use a common security pin: insert it between step 10 an 11.
- you can make monochromatic bows, if you prefer. But if you use a printed fabric for the bow, a central knot in a contrasting color is a good choice, expecially if it has a color that matches with the fabric of the bow (in my brooch: little red details on the bow and a red central knot).
-  of course fabric bows can be used not only to make brooches! Fix them on your hair clips, sew to the neck of your Teddy bear to give him a nerd look, use them to decorate you home... endless possibilities, as usual!
 
The brooch made by me for this tutorial is in my shop, in case you like it and have no time to make one.

Wednesday, 5 September 2012

Acid green patchwork (+ a photo tutorial)

In my home there's a little bathroom near the kitchen. Its colors are acid green, white and dark brown (the door). Love this colors together!
Recently we bought a new piece of forniture in white.
I liked it, but its upper shelf seemed to me so empty!
So I decided to decorate it a bit with a piece made by me. It was a great occasion to use some green and brown fabric scraps I religiously saved :)
Time for patchwork!!!
 
This is what I made:
(I don't know how to call it, both in italian and in english... suggestions?)
 
The inspiration came from the book "The practical guide to patchwork" by Elizabeth Hartman. Of course her instructions in the book are for a big quilt, but I decided to work in smaller dimensions and to sew a block made of only 9 squares (adjusting the measurements).
 
I had a lot of fun taking photos of the whole process to share with you, but I didn't want to make this post too heavy, so I put them together in a collage with picmonkey.
The result is a sort of photographic (and intuitive) tutorial, similar to the one I made for my fabric peonies.
I also wrote a scheme of the measurements in my sewing notebook.
Hope these two little things will help you to make something for you or your home.
Fabric used for this project:
- dove-color leftovers (I used this fabric before for this bag for me and this bag for Gaf)
- 2 squares of fabric with paisley pattern (part of a batch of sample I received as a gift)... paisley is my new obsession!
- 1 square of recycled upholstery fabric (center)
- 6 squares of fabrics scraps I bought years ago from U-handbag shop, when Lisa, the owner, was selling bags of mixed leftovers of the fabrics she used to make her bag for the shop.
- dark brown fabric for the back
- a sheet of "spongy" interfacing
 
Now my bathroom is a happier place to be :)

Sunday, 27 May 2012

Tutorial: how to make fabric peonies

Have you read my last post?
It's about the bag I made for my friend Francesca, embellished by three fabric peonies. They are similar to my peonies brooches, but smaller.
Today I want to show you how I made them. A sort of tutorial :)
I think this is a funny project to use some fabric scraps and to sew by hands (a relaxing activity, in my opinion, perfect to be done outdoor in summer).


Step 1:
Cut a stripe of fabric approx. 45 cm in lenght and 3 cm in height (you can change dimensions if you want to make bigger flowers). Please, pick up a fabric that doens't fray a lot.


Step 2: Fold the fabric.


Step 3:
Cut the upper edge giving it the shape of 4 or 5 petals. You don't need to be precise, because in nature petals haven't always the same dimension and the same shape.


Step 4:
Open the fabric stripe and, with needle and thread, sew by hand a row of stitches in the lower edge. While sewing, start to pull a bit to gather the fabric.


Step 5:
Going on in gathering the fabric, roll up the petals, fixing them with a stitch or two now and then.


Step 6:
When you reach the stripe's end fix the flower's bottom with other stitches to secure it. And, voilà, you have a lovely peony in your hand :)


I hope you will appreciate my tutorial.
These flowers can be used not only to decorate bags and to make brooches, like I did, but also to embellish hair pins, pony tails elastics or headbands, or (why not?) to create a vase of faux flowers.
Endless possibilities! Write me your ideas in the comments, please!
And don't forget to take a look in my 'for you' tag for other tutorials and free crafty things to be inspired by.

Wednesday, 28 March 2012

A recycled notebook made of...

... bread bags! :)
I've already said that I'm becoming a "crazy recycler". And I have a firm purpose to go on! :P
Today I made a little notebook using some bread bags we had at home, together with a cereal box and a fabric scrap.
Probably you know that in Italy we eat a lot of yummy bread; we can't eat without bread!
S. and I buy it almost everyday and so we have at home a lot of brown paper bags where bakers put bread. And also some greengrocers use similar bags, smaller but stronger.
Some days ago I decided to make something with them.
And I made a notebook :)

I documented the whole (super simple) process with photos.

I picked up some bags in different tones and decorated by lovely drawings and words:

Then I cutted them in rectangles (cm 21x13). I saved all the parts with prints and letters, because my purpose was to have those simple (but cute!) designs in my notebook. I cutted also a part of a cereals box to make a strong cover:


Time to fold all the rectangles in two:


The sewing machine is the right tool to fix fabric to the cover (zigzag stitches); I used a green fabric I really like (expecially for slippers):


My sewing machine is strong and I can use it to bind the notebook:


TA-DAA! A little recycled notebook is ready to be filled!


I'm not sure how I will use it.
I'm still writing on my old pocket moleskine (a few white pages remain); my project was to go on writing my thoughts on the Little Prince moleskine I bought last year in may! Uhm, I can't wait to use this one, so probably the little recycled notebook will be used for something else. It can become a little art journal, why not? I can experiment with (scary!) collages in small scale (ideal for me).

A little detail of the inside of the cover:


I couldn't resist to sign it with some of my handcarved stamps :)

I like this notebook, because:
- it's recycled
- it has a lot of different tones of brown inside (and some white)
- the fabric cover is so soft!

Tuesday, 13 March 2012

About sewing clothes

Last january I started to sew a skirt for me.
A super simple A-line skirt in a beautiful high quality wool fabric I bought expressly for this project.
I designed the pattern by myself, following this book's instructions and started to sew.
I also took a photo of the process, as you can see.

But... ouch, I failed :(
The skirt came out too big for me and I gave up.
And the reason is that I'm totally scared by sewing clothes. I can't understand why.
I have not this fear when I sew other things. It's the same panic I feel when I think about making collages, painting on stones and other creative things I want to try, but I simply can't for some reasons.

But yesterday I decided to jump over this fear and try again!
Spring is coming and I want some lovely and feminine clothes for the new warm season. Beautiful tops and tunics, skirts and dresses :)
I'm in love with "Darling ranges dress" by Megan Nielsen (I love Paunnet's version!) and her "Banksia top".
And also "Sencha top" by Colette Patterns is amazing! You can make it in three different versions.
Of course I have at home some issues of Burda style and of a similar italian sewing magazine called "La mia boutique", both full of lovely models to try.
And I like this tunic (it seems so simple to make!), Heather Ross's "Summer blouse" published in "Weekend sewing" (here a lovely version) and all Victory patterns!
Please, help me! I'm a bit confused about where to start!
Can you link me some easy patterns for a beginner clothes-maker like me?
Probably I'll join "Spring top sewalong": it can give me the right motivation to start sewing clothes, don't you think?
Related Posts Plugin for WordPress, Blogger...